The need for automation in demanding applications is rapidly growing, and so is the demand for real-time data for in-process control and verification, as well as validation of digital assets, such as digital twins and offline simulations.
The use of robots, even when combined with traditional machine vision, cannot always keep up with these demands. Often, this is because the machine vision is mounted to the robot itself, and is only able to provide local alignment without context of the broader datum structure or environment.
Moreover, machine vision systems usually require highly skilled labour for both their commissioning and operation. This dependence on specialised expertise acts as a barrier to seamless integration and often hinders the widespread adoption of machine vision in industrial settings.
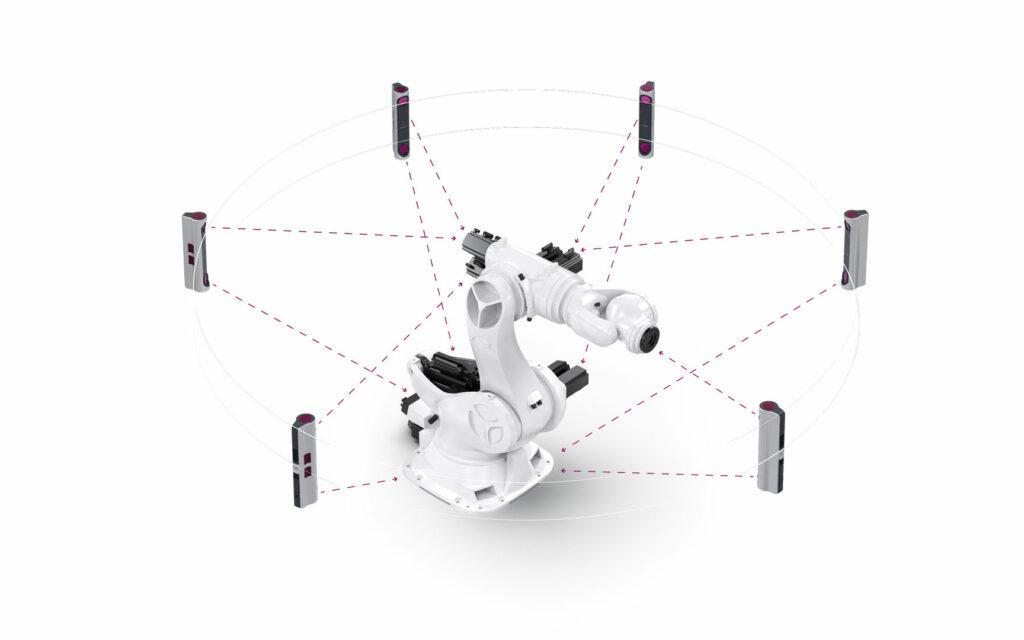
IONA is a metrology guidance system that has been designed from the ground up to solve many of typical pitfalls of machine vision systems whilst enabling process improvements across many applications.
This article is going to delve into these issues in more detail and outline how IONA solves them.

IONA drives high accuracy when local datum structures do not exist
Unlike traditional vision systems which are typically mounted on the robot, IONA provides absolute global position information, in-process and instantly. This allows process tasks to be guided relative to a global datum feature rather than local, comparative alignment.
This is critical for processes where local datum structures are not readily measurable, for example depositing materials (composite or additive manufacturing), trimming or machining, and aligning large structures and assemblies.
Using a robot-mounted camera to set a local alignment can also fall short where process forces influence accuracy, such as dynamic loads from end effectors. IONA can continually correct to compensate for process loading.
These factors have hampered robotic adoption up till now. For example, in aerospace there are often no features on a wing-skin and there is a requirement for both global (absolute) and local tolerances.
With the ability to align and correct in process to global datum structures, IONA unlocks the ability to automate a far broader range of manufacturing tasks.
Global Positioning for Local Sensing Data
IONA can provide global positioning for a wide range of local sensors, hugely increasing their usefulness. NDT sensors, Machine Vision cameras, Gap/flush laser measurements, defect detection, can all be enhanced with the addition of accurate global coordinates.
Improved Accuracy
Local sensors have traditionally relied on robot accuracy, but robot positioning errors are significant, and hard to predict especially with heavy end-effector payloads, or where external forces are applied. IONA offers a more robust approach, as it provides independent and external metrology data to guide the process rather than relying on robot accuracy.
Positional Data as a Service
The IONA system runs 24/7 providing accurate positional data of all cell elements to the many ‘customers’ of this type of data. For example, data requirements of Statistical Process Control (SPC) analysis, digital twin verification, MES, and i4.0 data visualisation platforms etc. While the uses of this data are highly diverse in an advanced manufacturing environment, IONA can service them all on demand in real time.
Reduce Operational Cycle Time
Obtaining accurate positional data for process commissioning is a time-consuming task. It typically involves using measurement equipment or manual processing methods, both of which are time-intensive processes. IONA offers the advantage of providing instantaneous positional data, eliminating the time usually required to align work objects within an automation cell. This feature enables a significant reduction in cycle time. When this time savings is accumulated throughout a production schedule, it can result in substantial cost savings, higher production volumes and performance.
Reducing inspection requirements
Vision systems are widely used to verify local geometry – such as a hole diameter – but they cannot verify the location of a hole relative to a datum. This is why manufacturers wanting to verify ‘in-line’ strive for ‘absolute’ measurements that accurately relate to a coordinate system.
IONA provides external and independent information about the fixture and robot positioning via an independent coordinate system that can be related to both the product and manufacturing datum structure. This offers an independent and accurate verification of process performance, generating data for statistical process control that can be used to reduce the requirement for end of line inspection.
Local sensors can only use the robot’s own understanding of position which is limited to millimetre accuracy or worse and therefore is of limited use for true verification of a product against the design intent. Using local sensing for in-process inspection is potentially guilty of “marking its own homework” (machine vision is blind to the global inaccuracies of the robot and is therefore blind to the very inaccuracies that the robot builds into the part). This problem is overcome by using IONA as an independent verification system.

Enhanced Diagnostics
IONA provides continual measurement of the key elements of an automation cell – alignments, in-process performance, fixture positions, etc. This allows accurate diagnostics to take place to ensure consistent output is maintained but also provide a baseline dataset to check against if an incident occurs.
If a non-conformance issue is exhibited in a part, IONA enables easy identification of where an error/non-conformance is propagating from. Local sensors are unable to detect such interactions.
No-integration
IONA is an out-of-the-box solution. Positional data can be collected without the requirement of a skilled metrology engineer or dedicated measurement equipment. The UX of the software has been designed to enable shop floor operators to use and control the system without new software needing to be learned and no bespoke applications to be individually catered for. The positional data is callable directly from the native robot program in a readily usable format.
Since IONA provides data in whatever frame of reference is required, offline programs (OLPs) can be used in whatever is the native datum structure.
Engineering decisions on local features/datums are not required.
IONA Outcomes
20X
faster alignment process
Automated Robot to Part Alignment
10X
increase in process accuracy
Improves robot performance
100%
confidence through 24/7 monitoring
Continual process monitoring
The Solution

INSPHERE has developed the IONA system to provide accurate real-time monitoring of robotics and so it is ideally suited to this setting. It has the added advantage that monitoring data can be used to control the robot directly through closed-loop feedback, enabling sophisticated control of the robot AM process.

